September 10, 2026
Home Bakers: Gelatin Stabilized Whipped Cream, Copy Ready + 5 Methods
Get a copy ready gelatin recipe for pipeable stabilized whipped cream, five tested alternative methods, and Forkward Kitchen's make ahead tips for...
Home Bakers: Gelatin Stabilized Whipped Cream, Copy Ready + 5 Methods
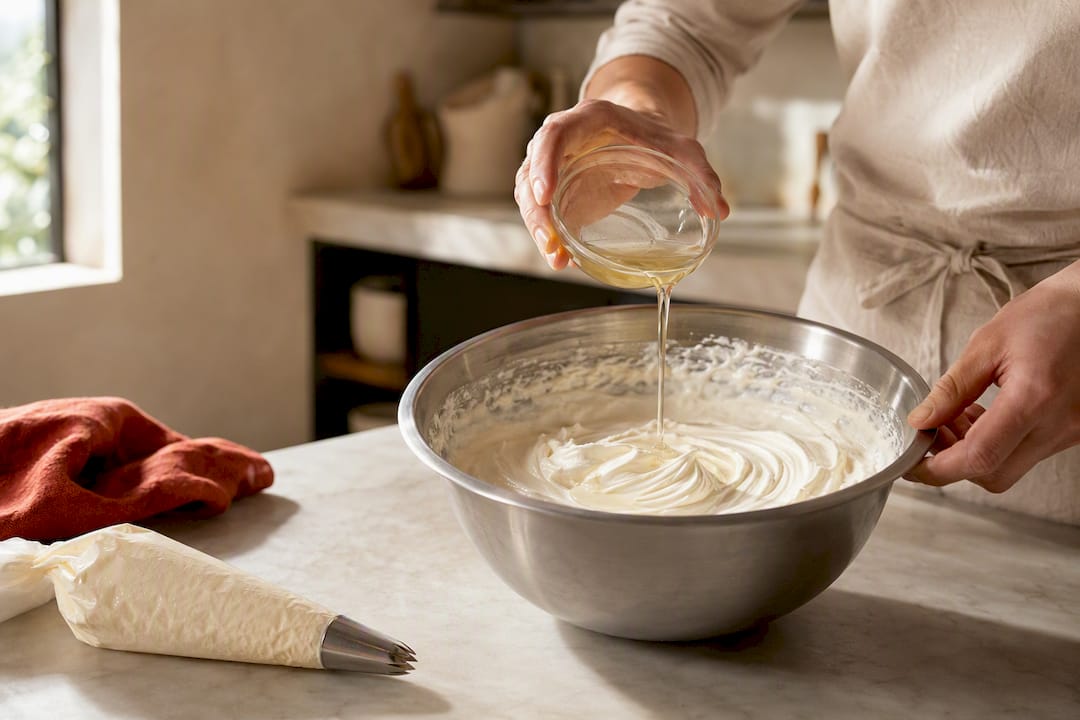
The fastest, most reliable way to get pipeable stabilized whipped cream is the gelatin method: bloom a little unflavored gelatin, melt and cool it, then fold it into softly whipped cream. It holds its shape in the fridge for roughly 24 to 48 hours without weeping. Just don’t let finished dairy sit out longer than a couple of hours, as dairy should not be left at room temperature for prolonged periods. If gelatin isn’t your thing, five other methods below work almost as well.
TL;DR:
- Gelatin provides the longest-lasting stabilization, maintaining pipeable shape for 24 to 48 hours in the refrigerator.
- Incorporating powdered gelatin requires blooming, gentle melting, and tempering before blending into whipped cream to avoid grainy textures.
- Alternates like pudding mix, mascarpone, powdered sugar with cornstarch, marshmallow fluff, and food processor methods each vary in shelf life, flavor, and application.
- Proper tools and techniques, such as using a cold bowl, chilling the cream, and careful tempering, are essential to prevent weeping, graininess, or overwhipping.
- Stabilized whipped cream is not safe out of refrigeration beyond two hours and should be stored in airtight containers or piped bags kept cold until use.
Table of Contents
- What Is Stabilized Whipped Cream, Exactly?
- The Gelatin Method: A Copy-Ready Recipe for Pipe-Able Cream
- Five Proven Alternatives to Gelatin (and When to Use Each)
- Ingredients and Equipment That Actually Matter
- How to Temper and Whip Without Wrecking the Texture
- Storage, Shelf Life, and Food-Safety Limits
- Fixing Weeping, Graininess, and Overwhipped Cream
- Putting Stabilized Whipped Cream to Work in Real Desserts
- Forkward Kitchen’s Tested Tips for Reliable Make-Ahead Cream
- Why Most Recipes Oversell the “Set It and Forget It” Promise
- Sources
What Is Stabilized Whipped Cream, Exactly?
Regular whipped cream is just air beaten into fat, and that structure collapses within a few hours because the water in the cream separates back out. Stabilized whipped cream is heavy cream that’s been reinforced with an ingredient, usually gelatin, cornstarch, or a starch-based mix, that traps that water and locks the foam in place. The result pipes cleanly, holds its ridges overnight, and doesn’t turn into a puddle under a warm cake layer.
This matters more than most recipes let on. Regular whipped cream is fine for a bowl of berries you’re eating in the next twenty minutes. It’s a disaster for a cake you’re decorating the day before a party. The stabilizer is what separates “looks great for photos” from “still looks great when your guests arrive.”
The Gelatin Method: A Copy-Ready Recipe for Pipe-Able Cream
Gelatin gives you the closest thing to a neutral-flavored, professional-grade hold. Pastry cooks lean on it specifically because it doesn’t change the taste of the cream the way pudding mix or marshmallow can. It’s also the method that survives the longest in the fridge without breaking down.
Ingredients (per 1 cup heavy cream):
- 1 cup cold heavy cream (36% fat or higher)
- 2 tablespoons granulated sugar or powdered sugar
- 1/2 teaspoon powdered gelatin
- 2 teaspoons cold water
- 1/2 teaspoon vanilla extract (optional)
Equipment: a chilled metal bowl, a hand mixer or stand mixer with a whisk attachment, a small microwave-safe bowl or ramekin, and a rubber spatula. This scales cleanly, so double or triple it for a full cake or a dozen cupcakes. Yield is about 2 cups of finished whipped cream per cup of starting cream.
Instructions:
- Bloom the gelatin. Sprinkle the powdered gelatin over the cold water in a small bowl. Let it sit for 5 minutes until it looks like a wet, wrinkled sponge. Don’t skip this step. Gelatin added dry or unbloomed clumps instead of dissolving smoothly.
- Melt it gently. Microwave the bloomed gelatin in 5 second bursts, or set the bowl in a bit of simmering water, until it turns fully liquid and clear. It should be warm, not hot.
- Cool it slightly. Let the melted gelatin sit for a minute or two off the heat. You want it warm enough to still pour, but not steaming.
- Whip the cream to soft peaks. In your chilled bowl, beat the cream and sugar on medium speed until it just holds a soft peak that droops when you lift the whisk.
- Temper the gelatin. Whisk one tablespoon of the whipped cream into the warm gelatin to bring its temperature down gradually. This is the step most home cooks skip, and it’s the one that prevents rubbery specks.
- Stream it in. With the mixer running on low, pour the tempered gelatin mixture into the whipped cream in a steady stream.
- Finish whipping. Increase speed slightly and whip until you reach firm, pipeable peaks that hold their shape without collapsing.
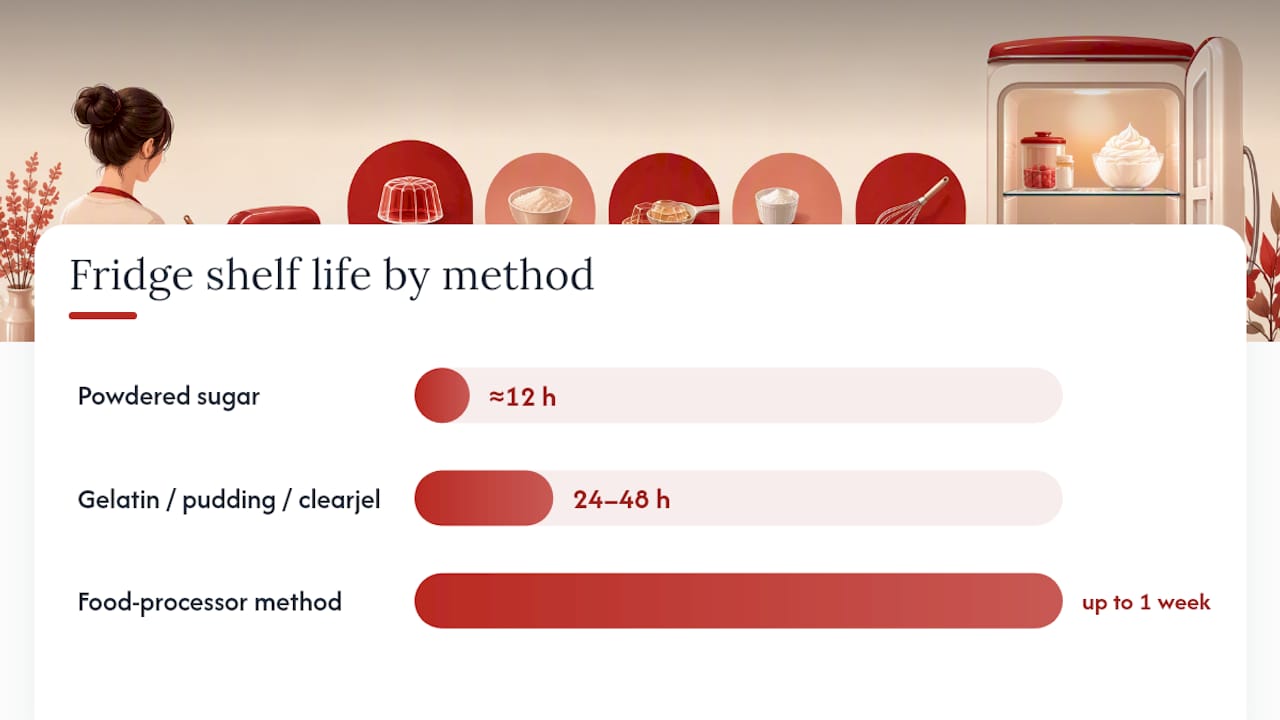
Statistic to remember: confectioners’ sugar alone buys you about 12 hours of hold, while gelatin, pudding mix, or clearjel push that window out to 24 to 48 hours. That gap is the whole reason gelatin earns its extra five minutes of effort.
Once it’s whipped, fill your piping bags right away, press out excess air, and refrigerate them flat or standing in a tall cup. Chilled, filled bags pipe cleaner than cream you whip and then bag later, since the cold keeps the fat structure firm as you squeeze.
Five Proven Alternatives to Gelatin (and When to Use Each)
Gelatin isn’t the only route to whipped cream gelatin substitutes that hold up. Here’s what else works, with exact ratios so you’re not guessing.
Instant pudding mix or clearjel Whisk 2 tablespoons of instant vanilla pudding mix (or 1 tablespoon of clearjel, a modified cornstarch used by professional bakers) into 1 cup of cold heavy cream before you start whipping. Beat to stiff peaks as normal. This is the fastest stabilized whipped cream stabilizer to grab off a shelf, and it holds for roughly 24 hours refrigerated. The tradeoff is flavor: pudding mix adds a faint vanilla sweetness and can tint the cream slightly yellow. Clearjel is more neutral but harder to find outside baking supply stores. Best for: quick weeknight desserts, or when you want a shortcut and don’t mind a hint of vanilla.
Mascarpone Fold 1/4 cup of softened mascarpone into 1 cup of whipped cream once it’s at soft peaks, then continue whipping to stiff peaks. Mascarpone’s high fat content thickens the cream almost immediately and adds a rich, slightly tangy depth. It won’t pipe as cleanly as a gelatin version, since it’s denser and softer at the edges, but it’s fantastic for dolloping over pie or folding into a tiramisu-style filling like the one in Creamy Pistachio Tiramisu with White Chocolate. Best for: rich fillings and dollop toppings where flavor matters more than sharp piping detail.
Powdered sugar and cornstarch Skip granulated sugar and use 2 to 3 tablespoons of powdered sugar per cup of cream instead. Because powdered sugar already contains cornstarch as an anti-clumping agent, it gives you a light stability boost with zero extra ingredients. It’s the easiest upgrade over plain whipped cream, but it only buys about 12 hours before the texture starts to soften. Best for: same-day serving, or topping a dessert you’re serving within the next several hours.
Marshmallow or marshmallow fluff Melt 1/4 cup of mini marshmallows (or use an equal amount of marshmallow fluff) with a splash of cream in the microwave, cool until just warm, then fold into softly whipped cream. This gives a noticeably sweet, slightly sticky finish that holds well but skews the flavor more than any other method here. Best for: dessert bars, s’mores-style builds, and kid-friendly treats where extra sweetness is a feature, not a bug.
Food processor method Pour cold heavy cream and sugar directly into a food processor and pulse until stiff, watching closely since it goes from soft to over-thick fast. This method needs no added stabilizer at all. It works by breaking the cream into smaller air bubbles than a whisk can manage, which creates a denser foam that resists collapse for up to a week under refrigeration. The texture ends up closer to a light frosting than classic whipped cream. Best for: cake frosting substitutes and situations where you want maximum shelf life with zero additives.
| Method | Ratio per cup of cream | Fridge hold | Best for |
|---|---|---|---|
| Gelatin | 1/2 tsp powdered gelatin + 2 tsp water | 24 to 48 hours | Piping, decorating, make-ahead cakes |
| Instant pudding/clearjel | 2 Tbsp pudding mix or 1 Tbsp clearjel | ~24 hours | Quick prep, casual desserts |
| Mascarpone | 1/4 cup softened mascarpone | ~24 hours | Rich fillings, dollop toppings |
| Powdered sugar | 2 to 3 Tbsp powdered sugar | ~12 hours | Same-day serving |
| Marshmallow fluff | 1/4 cup melted marshmallows | ~24 hours | Sweet builds, kid-friendly treats |
| Food processor | No additive needed | Up to 1 week | Frosting substitute, longest hold |
Ingredients and Equipment That Actually Matter
Not all heavy cream whips the same, and the tools you grab change your results more than most recipes admit.
Cream needs at least 36% milk fat to whip properly and hold air; anything labeled “light cream” or “half-and-half” won’t stiffen no matter how long you beat it. Cold cream is non-negotiable, and so is a cold bowl. Fat molecules trap air far more efficiently below 40°F, so chill your metal bowl and whisk attachment in the freezer for 10 to 15 minutes before you start.
On sugar: granulated dissolves slower and can leave a slightly grainy bite in a fast-whipped batch, while powdered sugar dissolves instantly and adds a touch of natural cornstarch stability. On stabilizers, know the difference between the options:
- Powdered gelatin dissolves faster and blooms in a flat layer, making it the easier choice for most home kitchens.
- Leaf gelatin gives a slightly cleaner set with less risk of a “jiggly” aftertaste, but it needs to be soaked in ice water and squeezed dry before melting.
- Clearjel is a modified cornstarch that thickens without the gelatin taste, though it’s harder to find at a regular grocery store.
- Instant pudding mix is the most accessible option but always adds a faint vanilla flavor and slight color.
- Mascarpone varies by brand. Look for one with a clean, mild tang rather than an overly sour or watery tub.
For tools, a stand mixer saves your arm on large batches, but a hand mixer works fine for a single cup or two. Keep piping bags, a few basic star and round tips, and an airtight container on hand for anything you’re not piping immediately.
How to Temper and Whip Without Wrecking the Texture
Tempering is the one step that separates smooth stabilized whipped cream from cream full of tiny rubbery flecks. The fix is simple, but skipping it is the single most common mistake home bakers make.
Once your gelatin is melted and slightly cooled, don’t dump it straight into cold whipped cream. That temperature shock causes it to seize into little gel beads instantly. Instead, whisk one tablespoon of the already-whipped cream into the warm gelatin first. This brings the gelatin’s temperature down gradually so it blends in without shocking.
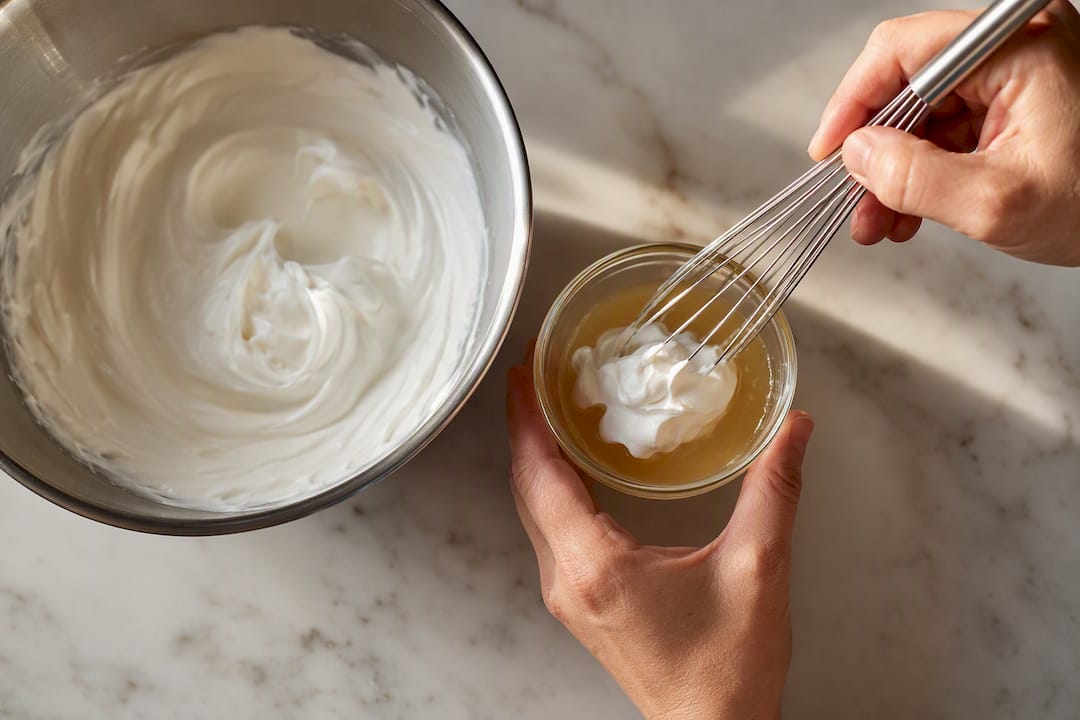
Only then should you stream the tempered mixture into the bowl, with the mixer running on low speed. This keeps the gelatin distributing evenly instead of pooling in one spot.
Watch your peaks closely. Soft peaks droop gently off the whisk. Stiff peaks stand up straight and hold a texture like whipped icing. Stabilized whipped cream should stop at a point that’s slightly past soft peaks but before full stiffness, since it continues to firm up over the next few hours as the gelatin fully sets.
Pro Tip: If your mixer is running fast and the cream suddenly looks lumpy or slightly curdled at the edges, slow down immediately. That’s the first visual sign you’re seconds from overwhipping into butter.
Common mistakes and fixes:
- Gelatin added too hot: it seizes on contact. Let it cool until just warm before tempering.
- Whipping on high speed the whole time: produces a grainy, unstable foam. Start medium, finish low.
- Adding stabilizer too early, before any peaks form: the cream never develops proper structure. Whip to soft peaks first, always.
Storage, Shelf Life, and Food-Safety Limits
How long your stabilized whipped cream lasts in the fridge depends entirely on which method you used. Powdered sugar alone gives you roughly 12 hours before texture loss. Gelatin, pudding mix, and clearjel extend that to 24 to 48 hours. The food-processor method, with its denser foam structure, can hold up to a week under ideal refrigeration.
None of that changes one hard rule: stabilization prevents weeping, but it does not make dairy safe outside the fridge. Any dessert with stabilized whipped cream on it needs to go back into refrigeration within two hours of being served, full stop, regardless of which stabilizer you used.
For storage:
- Keep bulk stabilized cream in an airtight container, pressed with plastic wrap directly on the surface to limit air exposure.
- Fill piping bags ahead of time, squeeze out excess air, and refrigerate the filled bags overnight if you’re decorating the next day. This is a genuine time-saver for anyone assembling a cake before a big event.
- If you’re transporting decorated desserts, use an insulated cooler bag with an ice pack rather than relying on car air conditioning.
Fixing Weeping, Graininess, and Overwhipped Cream
Most stabilized whipped cream failures trace back to one of three causes, and all three have fast fixes.
- Weeping (liquid pooling at the base): usually caused by too little stabilizer, cream that wasn’t cold enough when whipped, or a warm kitchen speeding up separation. Prevent it by using the full stabilizer ratio and keeping your bowl and cream cold throughout.
- Grainy or curdled-looking texture: typically means you whipped too fast for too long, or added hot gelatin without tempering it first. If it’s mild, gently fold in a splash of cold cream and re-whip briefly by hand.
- Overwhipping into a butter-like clump: happens when you keep beating past stiff peaks. There’s no undoing this stage. If you catch it early, folding in a few tablespoons of fresh cold cream can sometimes loosen it back to a spreadable texture, but severe overwhipping means starting over.
If your cream has separated significantly rather than just softened, it’s faster and safer to remake it than to try rescuing it. A fresh batch takes ten minutes; a failed rescue attempt that still weeps by tomorrow costs you more time than starting over.
Putting Stabilized Whipped Cream to Work in Real Desserts
Once you’ve got a bowl of stable, pipeable cream, the real question is timing. Fill piping bags and chill them for at least 30 minutes before you start decorating; the cream firms up and pipes cleaner shapes when it’s properly cold. Star tips work well for rosettes and borders, while round tips are better for filling layers or piping dots.
For layer cakes and trifles, pipe or spread the stabilized cream itself up to a day ahead. Hold off on adding fresh fruit, fruit juices, or anything liquid-heavy until closer to serving, since those release moisture that can seep into the cream and undo your stabilizing work. A dessert like Salted Bourbon Banana Pudding Parfaits is a good example of layering stable cream ahead while keeping wetter components separate until assembly.
A few compatibility notes worth remembering:
- Don’t use stabilized whipped cream under fondant. Fondant needs a firmer, greasier surface like buttercream to adhere properly.
- Use it in place of buttercream when you want a lighter, less sweet finish on a cake or cupcakes.
- It’s not a substitute for commercial whipped topping in recipes built around that specific texture, like Strawberry Pretzel Cool Whip Dessert, since commercial whipped topping is made with hydrogenated oils and emulsifiers rather than dairy cream, and behaves differently in a recipe.
Forkward Kitchen’s Tested Tips for Reliable Make-Ahead Cream
A few small adjustments made a real difference in our kitchen tests. Cutting the gelatin water down to just under 2 teaspoons per half teaspoon of gelatin produced a slightly firmer bloom that melted more evenly and left fewer stray specks in the final cream. Letting the tempered gelatin mixture rest for a full 60 seconds before streaming it in also cut down on lumps noticeably compared to adding it right away.
Prep checklist for make-ahead decorating:
- Chill your bowl and whisk at least 15 minutes ahead.
- Bloom gelatin first, before you even measure your cream.
- Whip to soft peaks, temper, then finish to firm peaks.
- Fill piping bags immediately, remove air, and refrigerate.
- Leave filled bags overnight if decorating the next day.
For more make-ahead dessert techniques and gelatin-based recipes, browse the full recipe collection or check out our no-bake cheesecake recipe for another example of gelatin doing structural work in a chilled dessert. If you want to see gelatin-stabilized cream used in a completely different cultural context, the technique behind Danish risalamande relies on the same tempering principle.
Why Most Recipes Oversell the “Set It and Forget It” Promise
The biggest myth floating around stabilized whipped cream is that it’s a one-and-done fix. It isn’t. Every method here buys you time, not immunity. Confectioners’ sugar buys you an afternoon. Gelatin buys you a weekend. None of them buy you a countertop sitting out at a summer barbecue for four hours.
What gets underrated is tempering. Most recipe cards treat it as an optional footnote when it’s actually the difference between a smooth, professional-looking cream and one full of gritty specks that ruin the whole effort. If you only take one technique from this guide, take that one.
And the food-processor method deserves more attention than it gets. No additives, no flavor shift, and a week of hold in the right conditions. For a lot of home bakers chasing a purely dairy, additive-free result, that’s the better trade than reaching for pudding mix out of habit.
Start with gelatin if you want the most versatile, neutral result. Reach for the food processor if you want simplicity and the longest shelf life without buying a single extra ingredient.
— Oloru
Sources
- How to stabilize whipped cream (The Kitchn)
- Stabilized whipped cream (Taste of Home)
- Stabilised whipped cream (RecipeTin Eats)