September 3, 2026
Tempering Chocolate in 25 Minutes: Seeding Method for Home Cooks
A home-cook tested seeding-first method for tempering chocolate in small batches. Follow clear temperatures, simple tools, and practical fixes for glossy,...
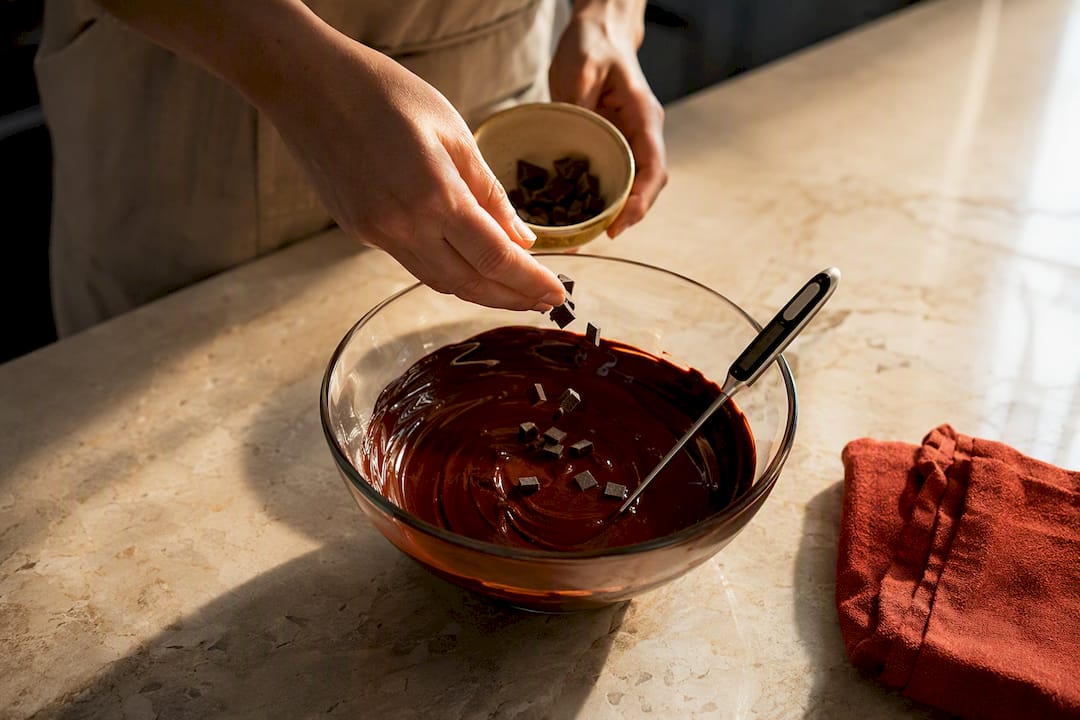
Tempering Chocolate in 25 Minutes: Seeding Method for Home Cooks
Tempering chocolate means melting and cooling it in a controlled way so its cocoa butter sets into stable crystals, giving you a glossy shine, a firm snap, and resistance to the dull gray streaks called bloom. The easiest reliable way to do this at home is the seeding method: reserve unmelted chocolate, melt the rest, then stir the reserved chocolate back in to guide crystallization. Target working temperatures are roughly 88 to 90°F for dark chocolate, 84 to 86°F for milk, and 82 to 84°F for white.
TL;DR:
- Using the seeding method, add unmelted chocolate gradually to melted chocolate at specific temperatures to ensure stable crystal formation.
- Keep the working temperature within narrow ranges—around 88 to 90°F for dark, 84 to 86°F for milk, and 82 to 84°F for white chocolate—to achieve proper tempering.
- A digital probe thermometer is essential for precise temperature control, and small, evenly chopped chocolate pieces help reduce melting and cooling time.
- Avoid water contamination and humidity, as these cause seizing and bloom, and store finished chocolate in a cool, dry place between 60-70°F.
- Tempering is necessary only for surface applications like dipping or coating; it can be skipped when chocolate is mixed into recipes where heat or ingredients disrupt crystal structure.
Table of Contents
- What Does Tempering Chocolate Actually Do?
- Which Chocolate Tempering Method Should You Use?
- How to Temper Chocolate at Home Using the Seeding Method
- Can You Temper Chocolate with a Bain-Marie?
- Is Microwave Chocolate Tempering Reliable for Small Batches?
- What Is Tabling and Do You Need Marble at Home?
- What Are the Exact Temperatures for Tempering Chocolate?
- What Tools and Chocolate Type Work Best for Tempering?
- How Do You Fix Chocolate That Won’t Temper Right?
- Do You Always Need to Temper Chocolate?
- What Did Forkward Kitchen Learn Testing This at Home?
- Why Learning to Temper Chocolate Is Worth the Trouble
- Sources
What Does Tempering Chocolate Actually Do?
Melt chocolate and let it cool randomly, and the cocoa butter inside forms a mess of unstable crystal types. Some are too soft, some too coarse. That’s why chocolate you melt and pour without any technique often turns dull, streaky, or crumbly instead of glossy and firm.
Tempering solves this by nudging the cocoa butter into one specific crystal structure, known as Form V or beta crystals. This structure is what gives well-made chocolate its glossy finish, its clean snap when you break a piece, and a set that holds up at room temperature without smearing on your fingers.
The process itself follows a curve: melt the chocolate fully to erase existing crystals, cool it to a point where the good crystals start forming, then bring it back up slightly to a working temperature where only the stable crystals survive and the unstable ones melt away. Get that curve right and you can dip, mold, or coat with a finish that looks like it came from a chocolate shop rather than a microwave accident.
Which Chocolate Tempering Method Should You Use?
Before you pick a method, know your options. Each one trades off convenience against control.
- Seeding: add unmelted chocolate to melted chocolate to introduce good crystals directly; fast, forgiving, and needs no special equipment.
- Bain-marie: melt chocolate gently over simmering water, then cool and reheat on the stovetop; simple but risks steam contamination.
- Microwave: short power pulses for small batches; convenient, but easy to overheat, especially with milk or white chocolate.
- Tabling: pour chocolate onto a cold marble slab and work it with a spatula until it cools; the traditional chocolatier method, but it demands equipment and practice most home kitchens don’t have.
Before you start any of these, run through a quick setup:
- Chop chocolate into small, even pieces so it melts evenly.
- Have a digital probe thermometer within reach, not buried in a drawer.
- Clear counter space and keep any bowl of water far away from your melting bowl.
- Set aside your seed chocolate (about a quarter to a third of your total) before you turn on any heat.
- Bring your kitchen to a normal room temperature. A hot, humid kitchen fights you the whole way through.
For most people cooking at home, seeding wins. It needs nothing you don’t already own, and it’s the method taught by Ecole Chocolat as the standard entry point for home tempering.
How to Temper Chocolate at Home Using the Seeding Method
Seeding is the seed tempering chocolate technique professionals recommend first because it’s hard to mess up if you follow the temperatures. Here’s the full protocol.
- Chop your chocolate finely and evenly. Uneven chunks melt at different rates and leave you guessing about doneness.
- Separate your seed chocolate. Set aside a sizable portion of your total chocolate, unmelted. This becomes your crystal source later.
- Melt the remaining 70 to 75% to melt temperature. For dark chocolate, that’s 113 to 122°F; milk and white chocolate melt around 113°F. Use a bain-marie or short microwave pulses, and remove from heat once fully melted.
- Add the seed chocolate gradually, stirring constantly. Drop in a handful at a time rather than dumping it all in. Keep stirring until the mixture cools to about 80.6°F (27°C), the cooling temperature that signals stable crystals are forming, a benchmark Valrhona uses in its own training curriculum.
- Strain out any unmelted seed chunks, then gently reheat the mixture to working temperature: 87.8 to 89.6°F for dark, 84 to 86°F for milk, 82 to 84°F for white.
- Test before you commit. Dip a spoon or a strip of parchment paper in the chocolate and let it sit at room temperature for 3 to 5 minutes. If it sets glossy and firm without streaks, you’re in temper.
If your chocolate drifts a couple of degrees above working temperature, don’t panic. Add a small amount of your remaining seed chocolate and stir it back down. If it drifts too cold and starts thickening, warm it in five-second microwave bursts, stirring between each one.
Pro Tip: Keep your seed chocolate in the freezer for a few minutes before adding it. Cold seed chocolate cools the batch faster and gives you tighter control over the exact moment it hits temperature.
Can You Temper Chocolate with a Bain-Marie?
A bain-marie setup is the stovetop version of tempering, and it’s the method most people picture when they think of melting chocolate over a pot of water. The trick is keeping water and steam completely away from the chocolate itself, since even a few drops will seize it into a grainy, unworkable mess.
- Fill a saucepan with an inch or two of water and bring it to a bare simmer, not a boil.
- Set a heatproof bowl on top, making sure it doesn’t touch the water directly.
- Melt chocolate to melt temperature, stirring gently and checking with your thermometer often.
- Remove the bowl from heat and set it in a shallow ice bath, stirring constantly until it hits cooling temperature.
- Return briefly to low heat, or hold the bowl a few inches above the simmering water, to nudge it up to working temperature.
The ice bath step is what separates a controlled bain-marie tempering from a guessing game. Dunk the bowl for a few seconds at a time, stirring between dips, so the outer edges don’t overcool while the center lags behind. According to Callebaut’s tempering guidance, this combination of gentle heat and controlled cooling is one of the three core professional methods, and it scales down to home batches without much fuss.
Is Microwave Chocolate Tempering Reliable for Small Batches?
For a single batch of dipped strawberries or a small tray of bark, the microwave can work, and it’s often faster than setting up a bain-marie. It’s also the least forgiving method if you rush it.
- Set your microwave to 50% power. Full power heats chocolate unevenly and scorches the edges before the center even softens.
- Pulse in short bursts of 10 to 20 seconds, depending on how much chocolate you’re melting. Smaller amounts need shorter pulses.
- Stir completely between every single pulse. This redistributes heat and lets you catch problems before they become a seized, grainy mess.
- Check temperature after each stir, not just at the end. Chocolate can look barely melted and still be dangerously close to overheating.
- Slow down as you approach melt temperature. The last 10 degrees matter more than the first 30.
White chocolate demands extra caution here. Its higher sugar and milk content makes it scorch far more easily than dark chocolate, so shorten your pulses and stop earlier than you think you need to, a caution Ecole Chocolat flags specifically for microwave work with lighter chocolates.
What Is Tabling and Do You Need Marble at Home?
Tabling is the technique you’ve probably seen in chocolate shop videos: a chocolatier pours melted chocolate onto a marble slab and works it back and forth with two spatulas until it thickens and cools. Melt the chocolate, pour most of it onto the marble, spread and gather it repeatedly until it cools to temperature, then stir it back into the reserved portion to even out the heat.
Marble works because it’s dense and stays cold, pulling heat out of the chocolate fast and evenly while the constant working action distributes crystal formation throughout the batch. If you don’t own a marble slab, a cold stainless steel countertop or a large metal baking sheet chilled in the freezer gets you most of the way there. Spread the chocolate thin, scrape and fold it with a bench scraper, and work quickly.
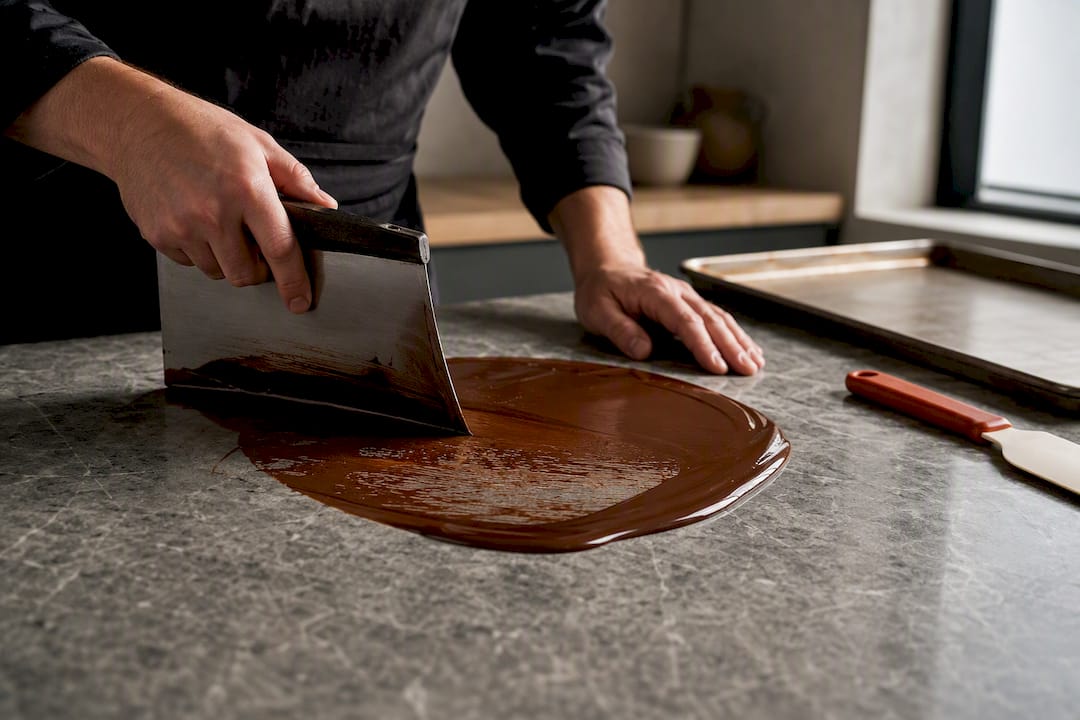
Seeding remains the more practical seed tempering chocolate approach for most home cooks, since tabling really rewards the space and repetition of a professional kitchen.
What Are the Exact Temperatures for Tempering Chocolate?
Every chocolate tempering method depends on hitting the same three temperature stages: melt, cool, and reheat to working temperature. The exact numbers shift slightly by chocolate type because of differences in milk solids and sugar content.
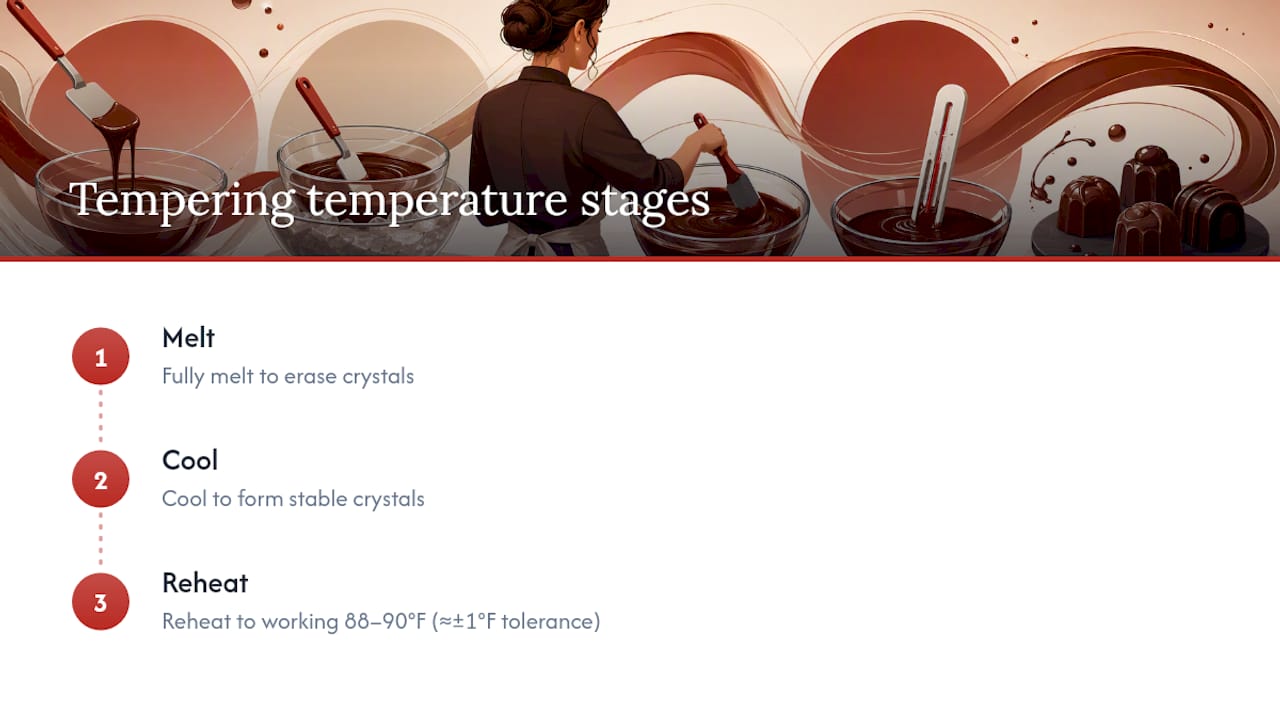
These numbers come directly from Valrhona’s tempering guidance, and give or take a degree of tolerance either way rarely ruins a batch. Higher cocoa percentage dark chocolates can sit at the upper end of the working range without issue.
The number that matters most: working temperature for dark chocolate sits at roughly 88 to 90°F, the narrow window where stable crystals survive and unstable ones melt away.
What Tools and Chocolate Type Work Best for Tempering?
A digital probe thermometer accurate to within a degree Fahrenheit is the single tool that separates consistent tempering from guesswork. Clip it to the side of your bowl or hold it in the center of the chocolate, never touching the bottom of the bowl where residual heat skews the reading.
- Digital probe thermometer with a range that reads down to at least 70°F.
- Two heatproof bowls, one for melting and one for the ice bath if using a bain-marie.
- A rubber spatula for stirring and a bench scraper if you try tabling.
- Couverture chocolate rather than standard chocolate chips, when possible.
Couverture chocolate contains at least 31% cocoa butter, which makes it more fluid and easier to work with than baking chips or compound chocolate, according to Valrhona’s own terminology guide. Compound chocolate, which swaps cocoa butter for vegetable fats, doesn’t need tempering at all, but it also won’t give you the same glossy snap. Check the ingredient label: if cocoa butter is listed high up and vegetable oil isn’t listed at all, you’re looking at real couverture.
Pro Tip: If your thermometer only reads down to 100°F, it’s the wrong tool for this job. You need one that reads comfortably below 80°F to confirm your cooling stage.
How Do You Fix Chocolate That Won’t Temper Right?
Most tempering failures show up visually before they show up in a bite. Learn to read the signs and you can catch problems before you’ve wasted a whole batch.
- Streaky or dull finish: usually means the chocolate never fully reached cooling temperature before reheating.
- Soft or smeary set: working temperature was too high, melting out the stable crystals you just built.
- Grainy or seized texture: almost always caused by even a drop of water or steam getting into the chocolate.
- Slow to set (over 10 minutes at room temperature): a sign the batch is under tempered and needs another pass through the cooling stage.
If chocolate seizes, resist the urge to add water or milk to loosen it up. That makes it worse. Instead, re-melt the batch fully, wiping your bowl and tools completely dry first, then start the seeding process over from scratch.
Bloom, the white or gray film that shows up days after dipping, usually traces back to storage rather than the tempering process itself. Humid kitchens and temperature swings during storage are common culprits, a point echoed in broader discussion of how heat and humidity destabilize chocolate during transit and storage. Keep finished chocolate in a cool, dry spot, ideally between 60 and 70°F, and away from direct sunlight.
Pro Tip: Store tempered chocolate in an airtight container away from strong-smelling foods. Chocolate absorbs odors from onions and garlic sitting nearby faster than most people expect.
Do You Always Need to Temper Chocolate?
Not always. If you’re folding melted chocolate into a batter, like the dark chocolate in these fudgy brownies, or stirring chocolate chunks through brown butter cookie dough, skip tempering entirely. Baking heat and other ingredients disrupt the crystal structure anyway, so the extra step buys you nothing.
Tempering earns its place when chocolate is the finished surface: molded candies, dipped strawberries, or a glossy coating over ganache. A simple rule works nearly every time: if chocolate is what the eye sees and the teeth bite into first, temper it. If it’s disappearing into a batter, save yourself the time.
What Did Forkward Kitchen Learn Testing This at Home?
Testing seeding across a dozen small batches at Forkward Kitchen turned up a few adjustments worth knowing before your first attempt. Chopping chocolate into pieces roughly the size of chocolate chips, rather than large chunks, cut melting time noticeably and made temperature control far more predictable.
The batches that succeeded on the first try almost always had one thing in common: seed chocolate added in small handfuls, never dumped in all at once. Rushing that single step caused more failed batches than any temperature error.
Expect your first attempt to take longer than a recipe suggests, closer to 25 minutes total once you factor in careful stirring and temperature checks. That’s a fair difficulty rating for a technique with real payoff: once it clicks, it clicks for good.
Why Learning to Temper Chocolate Is Worth the Trouble
The first time a batch actually sets glossy and snaps clean, something shifts. It stops feeling like a fussy pastry-school skill and starts feeling like a tool you can reach for anytime a recipe calls for dipped or molded chocolate. The lesson worth repeating to yourself on attempt three or four: small batches are your friend. A cup of chocolate teaches you the temperature curve faster, and cheaper, than a pound ever will.
Practice on scraps before you commit to a batch you care about, whether that’s a batch of dipped fruit or a finishing drizzle on a ganache-topped cake. The technique rewards patience more than talent.
If you’re ready to put tempered chocolate to work, browse the full recipe collection for ideas, or head straight to the advanced and chef-level recipes where tempering skills actually pay off.
— Oloru
Sources
This guide draws on tempering curricula from Valrhona, Ecole Chocolat’s seeding method, and Callebaut’s method comparisons, alongside Guittard’s guidance on when tempering is necessary.
- Tempering chocolate | Valrhona Chocolate
- How to Temper Chocolate: Seeding Method & Temperatures | Ecole Chocolat
- Guide to different tempering methods | Callebaut