July 31, 2026
Sheet Pan Meal Prep: Your 2-Hour Weekly Plan
Effortlessly simplify your week with sheet pan meal prep! In just 2 hours, create healthy, versatile meals that save time and energy.
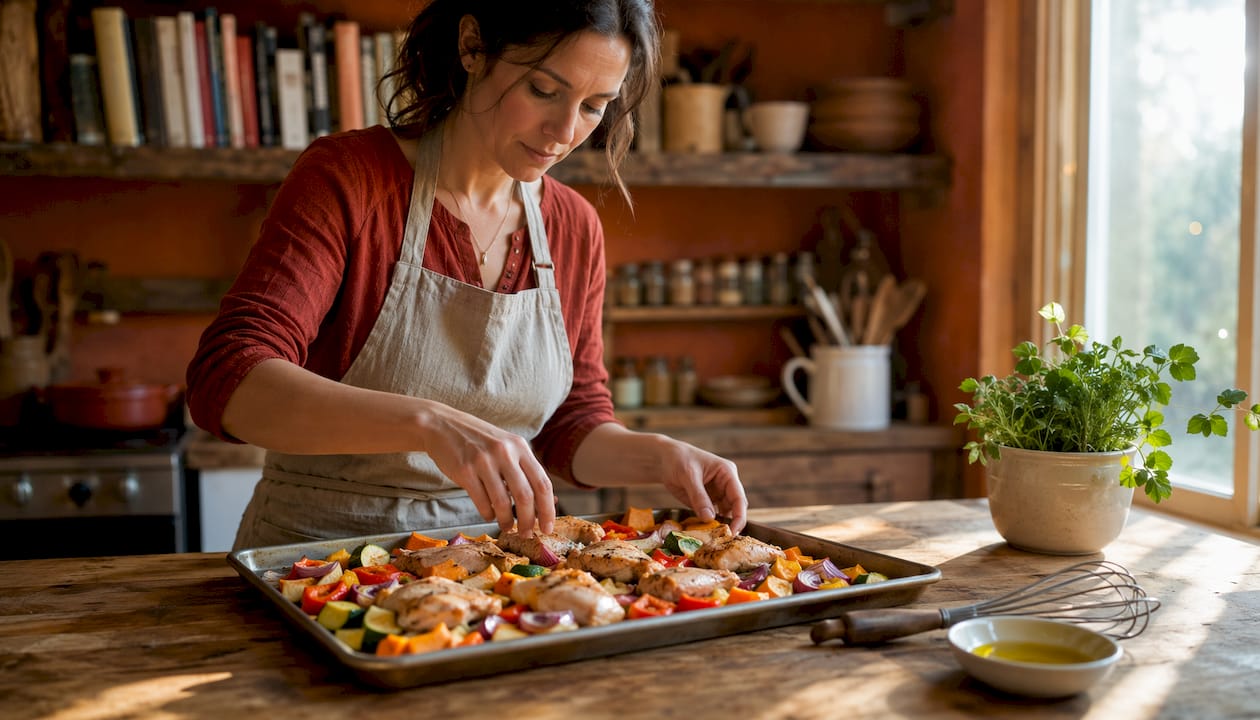
Sheet Pan Meal Prep: Your 2-Hour Weekly Plan
Sheet pan meal prep works, and it works well. The core idea is simple: roast proteins, vegetables, and starches on rimmed pans, portion them into containers, and pull from those parts all week. Think of it less as cooking complete meals and more as building a flexible inventory. A grain simmering on the stovetop, two pans rotating through the oven, and about two hours on a Sunday gets you several days of solid lunches and dinners.
The one-line plan: preheat to 400–425°F, start dense items first, add quick-cook vegetables in the final 10–15 minutes, cool, portion into airtight containers, and refrigerate within two hours per USDA food-safety guidance. Forkwardkitchen tests every sheet pan recipe for timing and yield, so the templates below are ready to run.
A few things to keep in mind before you start:
- Treat the pan output as meal parts: roasted protein, caramelized veg, a grain, and a sauce. Mix and match across the week.
- Cook grains separately on the stovetop — the oven is for browning, not boiling.
- Stage ingredients by cook time; never crowd the pan or you get steam, not caramelization.
- Label every container with the date and contents before it goes in the fridge.
Table of Contents
- How do you fit sheet pan meal prep into two hours?
- What gear and pantry staples do you actually need?
- How do you stage ingredients so nothing comes out soggy?
- Quick reference: oven temps and roast times for common ingredients
- Six sheet pan templates you can use every week
- How do you store and reheat sheet pan meals safely?
- What do you do when sheet pan meals go wrong?
- Key Takeaways
- Why the two-hour plan changes how you think about cooking
- Forkwardkitchen’s tested sheet pan recipes are ready when you are
- Selected sources and further reading
How do you fit sheet pan meal prep into two hours?
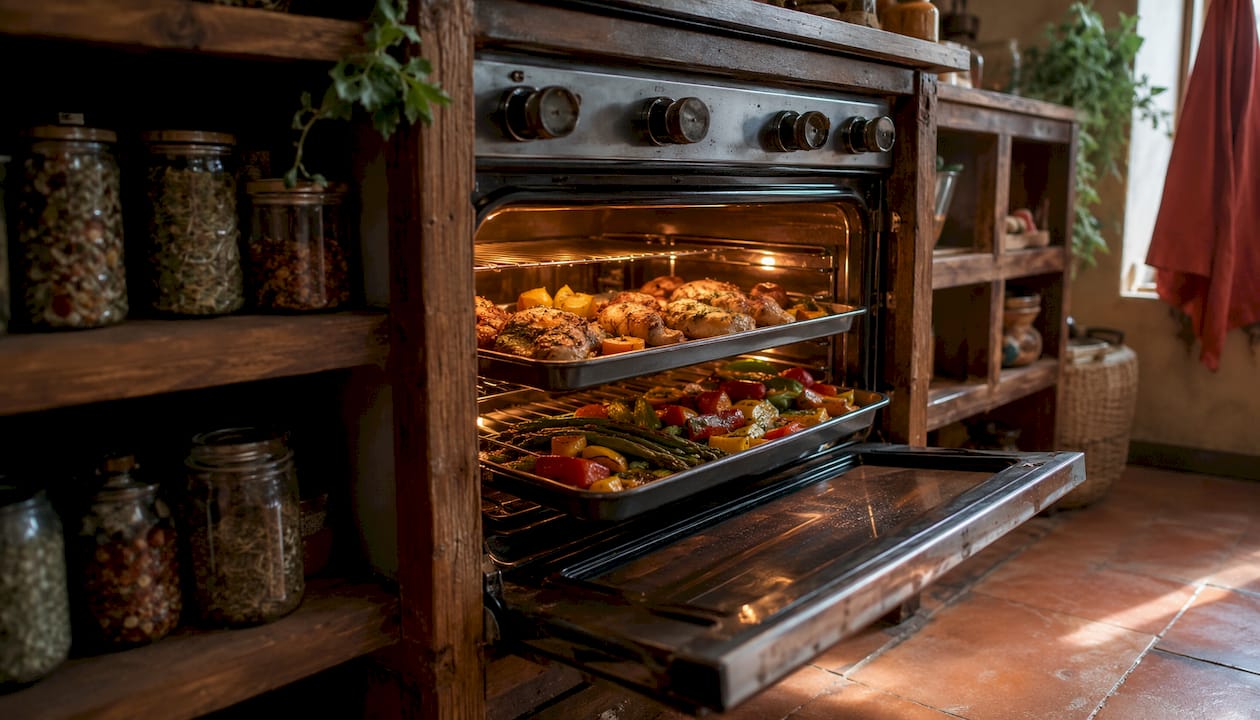
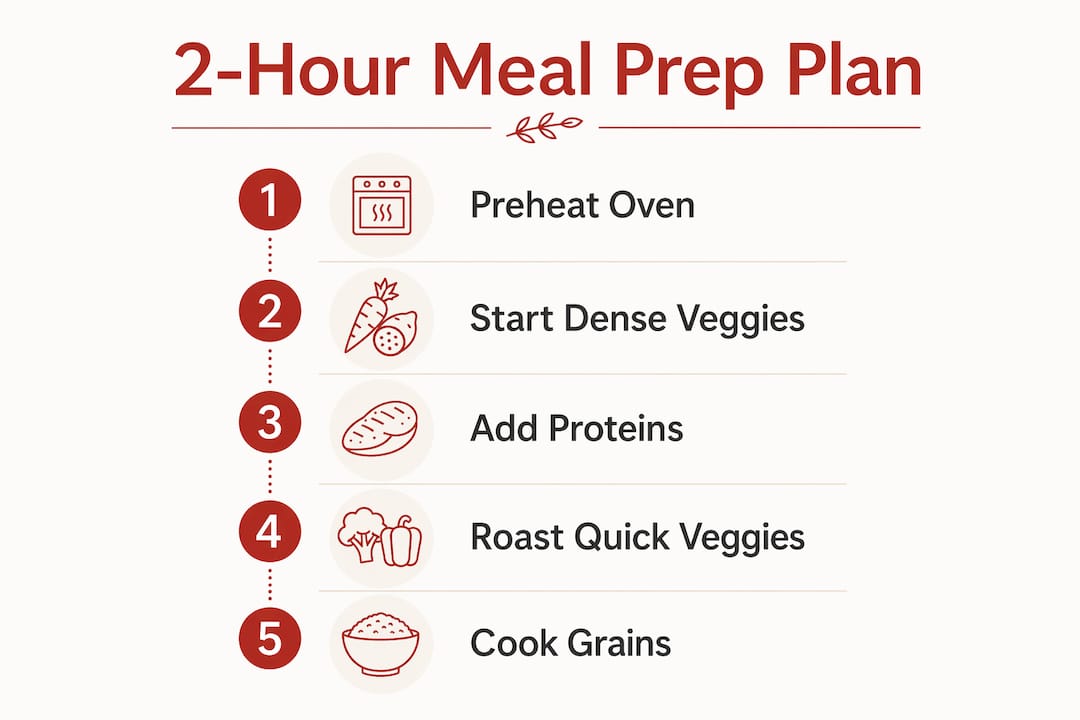
The two-hour window is real, but only if you run tasks in parallel. Here is a block-by-block schedule that covers three to four days of meals.
| Time block | What you are doing |
|---|---|
| a short initial period | Preheat oven to the moderate-high range around 400–425°F. Chop all vegetables, pat proteins dry, mix spice blends, set grains to cook on stovetop. |
| initial roasting phase | First pan in: dense roots (sweet potatoes, carrots, beets) and bone-in proteins. While roasting, prep sauces and portion containers. |
| middle roasting phase | Add second pan or add quick-cook veg to the first pan. Rotate racks halfway through for even browning. |
| later roasting phase | Final additions: leafy greens, cherry tomatoes, fresh herbs. Check internal temps. Drain and fluff grains. |
| cooling and storing phase | Cool everything on the counter (no more than the recommended maximum), portion into shallow containers, label, refrigerate or freeze. |
Running two pans simultaneously is the biggest time saver. Size them to fit your oven side by side on the same rack, or use upper and lower racks and swap halfway through. Batch similar oven temperatures together — if your chicken thighs and sweet potatoes both want 400°F, they share a session. If a recipe needs a different temp, run it as a second session rather than compromising either.
Chopping vegetables ahead and storing them raw in sealed containers the night before shaves another 10–15 minutes off your Sunday prep. At cooking time, you only need to toss with oil, season, and roast.
Pro Tip: Set a rice cooker or pot of quinoa going the moment you preheat the oven. Grains take 15–20 minutes and need zero attention, so they finish while the first pan roasts.
What gear and pantry staples do you actually need?
The equipment list is short. Buy it once and it lasts years.
Essential gear:
- Two rimmed half-sheet pans (18 x 13 inches): The rim prevents juices from spilling while the flat surface promotes even browning. Heavy-gauge aluminum is the standard choice.
- Parchment paper or silicone baking mats: Parchment speeds cleanup and prevents sticking; silicone mats are reusable and work well for lower-fat items.
- Oven thermometer: Most home ovens run 25–50°F off their displayed temperature. A $10 thermometer fixes that immediately.
- Instant-read thermometer: Pull poultry at 165°F internal temp every time, no guessing.
- Sharp chef’s knife and large cutting board: Uniform cuts are the foundation of even cooking.
- Shallow airtight containers: Glass containers with locking lids stack well and go from fridge to microwave without transferring food.
For shopping quality rimmed pans and bakeware, commercial-grade sheet pans hold heat more evenly than thin consumer versions and resist warping at high temperatures.
Pantry staples for quick, balanced seasoning:
- Olive oil, kosher salt, black pepper
- Smoked paprika, garlic powder, cumin, dried oregano
- A good acid: lemon juice, red wine vinegar, or apple cider vinegar
- Canned chickpeas and black beans (instant protein and fiber)
- Quick grains: quinoa, couscous, farro
- Sturdy greens: kale, arugula, shredded cabbage (hold up in containers)
Pro Tip: Invest in one heavy-gauge rimmed sheet pan before anything else. Thin pans warp at high heat, which tilts your food and creates uneven browning. A quality pan costs a moderate amount and outlasts many cheaper ones.
How do you stage ingredients so nothing comes out soggy?
Staging is the single skill that separates good sheet pan cooking from a pile of steamed, pale vegetables. The principle: group ingredients by how long they need in the oven, and add them in waves.
Dense, starchy vegetables — sweet potatoes, carrots, beets, parsnips — need about half an hour at 400°F. Bone-in chicken thighs need a bit longer, while broccoli, zucchini, and bell peppers finish in the final 15–20 minutes. Cherry tomatoes and spinach go in last. Put the slow items in first; add the fast ones later.
Cut size matters just as much as timing. Aim for 1/2-inch to 1-inch cubes for sweet potatoes and root vegetables, 1–2 inch florets for broccoli and cauliflower, and roughly 1-inch chunks for boneless chicken breast. Uniform pieces cook at the same rate; mismatched sizes mean some pieces burn while others stay raw.
Crowding the pan causes steaming rather than roasting. Leave roughly 1/2 to 1 inch between pieces so hot air can circulate. If your pan looks full, use a second pan. Overlapping parchment sheets also blocks airflow, so keep each pan’s liner flat and separate.
Pat proteins completely dry before seasoning. Wet surfaces steam and stay pale; dry surfaces sear and brown. This one step makes a visible difference on chicken skin, salmon fillets, and tofu alike.
A practical staging sequence: start sweet potatoes and carrots on one pan, roast 20–25 minutes, then add proteins and quick veg for the final 15–20 minutes. Or split protein and vegetables across two pans and swap racks at the halfway mark so both sides of each pan get direct heat.
Pro Tip: When combining items with different ideal temperatures, default to the higher heat and shorten the more delicate item’s time. A salmon fillet that roasts 12 minutes at 425°F beats one that limps along at 375°F for 20.
Quick reference: oven temps and roast times for common ingredients
Use this table when assembling any one-pan meal. Times assume a properly preheated oven and a single layer with space between pieces.
| Ingredient | Temp (°F) | Approx. time | Notes |
|---|---|---|---|
| Bone-in chicken thighs | 400–425 | medium duration | Pull at safe internal temperature; pat dry first |
| Boneless chicken breast | 400–425 | shorter duration | Cut to even thickness for even cook |
| Salmon fillet | 400–425 | shorter duration | Skin-side down; done when flesh flakes |
| Shrimp | 400–425 | brief duration | Add last; overcooks fast |
| Italian or plant-based sausage | 400–425 | medium duration | Slice for faster browning |
| Firm tofu (pressed) | 400–425 | medium duration | Flip once halfway for even crust |
| Sweet potatoes (medium cubes) | 400–425 | medium duration | Start first; par-roast before adding protein |
| Broccoli / cauliflower florets | 400–425 | shorter duration | Add after dense roots are partially done |
| Bell peppers / zucchini | around 400 | shorter duration | Add in last phase |
| Cherry tomatoes | around 400 | brief duration | Add last; burst and caramelize quickly |
| Baby potatoes (halved) | higher heat | medium duration | Par-roast first, then add protein |
| Brussels sprouts (halved) | higher heat | medium duration | Cut-side down for caramelization |
The 400–425°F range handles most mixed pans. Push to 425–450°F when you want rapid caramelization on dense roots or Brussels sprouts. Drop to 375–400°F for delicate fish like cod or tilapia.
Safety note: The USDA recommends pulling all poultry to an internal temperature of 165°F. Rest it two to three minutes before portioning.
Pro Tip: When two items need different temperatures, roast them on separate pans in back-to-back sessions rather than splitting the difference. Compromising the temp usually means one item is underdone and the other is dry.
Six sheet pan templates you can use every week
These six templates come from Forkwardkitchen’s tested sheet pan recipes collection. Each one follows the protein + veg + grain formula and scales to four servings. Storage times follow USDA guidelines: leftovers can be kept in the refrigerator for several days and frozen for longer if portioned and wrapped properly.
-
Garlic-herb chicken + sweet potatoes + broccoli Prep: 10 min | Temp: 400°F | Roast: 40 min total | Yield: 4 servings Season chicken thighs with garlic powder, dried thyme, olive oil, salt. Start sweet potatoes at minute 0; add chicken and broccoli at minute 20. Finish with lemon juice. Store grains (quinoa or rice) separately.
-
Salmon + baby potatoes + chickpeas Prep: 10 min | Temp: 425°F | Roast: 30 min total | Yield: 4 servings Par-roast halved baby potatoes and drained chickpeas for 18 minutes, then nestle salmon fillets skin-side down for the final 12 minutes. Serve with a herby yogurt sauce stored in a separate jar. Pairs well with Mediterranean chicken meal prep bowls flavor profiles.
-
Sheet pan sausage + peppers + onions + farro Prep: 8 min | Temp: 400°F | Roast: 25 min | Yield: 4 servings Slice sausage (Italian or plant-based), toss with peppers and onions, roast on one pan. Farro cooks on the stovetop in 25 minutes. This is the template for Forkwardkitchen’s sheet pan sausage and veggies recipe with hot honey broccolini.
-
Spiced chicken thighs + sweet potato + black beans Prep: 10 min | Temp: 400°F | Roast: 40 min | Yield: 4 servings Smoked paprika, cumin, garlic powder, olive oil. Start sweet potatoes at minute 0; add chicken at minute 15. Stir in rinsed canned black beans at minute 30 to warm through. Finish with lime juice and cilantro at serving.
-
Tofu + Brussels sprouts + carrots + quinoa Prep: 12 min | Temp: 425°F | Roast: 30 min | Yield: 4 servings Press tofu, cube to 1 inch, toss with tamari and sesame oil. Halve Brussels sprouts cut-side down, slice carrots 1/2 inch thick. Roast all together, flipping tofu once at 15 minutes. Quinoa on the stovetop. A great plant-forward option for balanced weekly prep.
-
Mediterranean tray: lemon chicken + cherry tomatoes + olives + orzo Prep: 10 min | Temp: 400°F | Roast: 30 min | Yield: 4 servings Marinate chicken in lemon, olive oil, and oregano. Roast with cherry tomatoes and olives. Cook orzo separately and toss with a splash of the pan drippings. For a grain-free swap, add roasted vegetables as a pasta mix-in later in the week.
Macro balance notes: Add a can of chickpeas or white beans to any template for extra protein and fiber. Swap the grain for cauliflower rice to lower carbs. A spoonful of tahini or a handful of feta at serving adds healthy fat without extra cooking.
How do you store and reheat sheet pan meals safely?
Cool cooked food to near room temperature before sealing containers, but do not leave anything out longer than two hours total. That two-hour window is the USDA’s standard for cooked food at room temperature. Spread food in shallow containers rather than deep ones to speed cooling and prevent condensation from making vegetables soggy.
Storage guidelines:
- Refrigerator: Most sheet pan meal leftovers keep several days when portioned into airtight containers. Label each container with the date.
- Freezer: Freeze for extended periods. Portion into individual servings before freezing so you can pull exactly what you need. Wrap tightly or use freezer-safe containers to prevent freezer burn.
- Sauces and toppings: Store separately. A yogurt sauce or vinaigrette in a small jar keeps 5–7 days and adds freshness at serving time.
- Delicate toppings: Add avocado, fresh herbs, and crumbled cheese at the moment of serving, not during prep.
Reheating options:
- Oven at 325–350°F for 8–15 minutes: Best for restoring crispness on roasted vegetables and chicken skin. Spread food in a single layer on a sheet pan.
- Microwave for 1–3 minutes: Fast and convenient, but expect softer texture. Cover loosely to prevent splattering.
- Stovetop pan-sear: 2–3 minutes over medium-high heat re-crisps chicken skin, sausage slices, and tofu cubes better than any other method.
Grains reheat best with a splash of water or broth added before microwaving. Stir once halfway through.
What do you do when sheet pan meals go wrong?
Most sheet pan failures trace back to three causes: pan crowding, wrong cut size, and moisture on the protein. Here is how to fix each one.
- Soggy vegetables: The pan was too crowded or the oven temperature was too low. Next time, spread veg across two pans and push the temp to 425°F. Larger cut sizes also help — small pieces release more moisture faster.
- Pale, soft chicken skin: The surface was wet before roasting. Pat the chicken completely dry, season right before it goes in the oven, and roast skin-side up on a hot pan.
- Potatoes still firm when everything else is done: Par-roast them alone for 15–20 minutes before adding anything else. Dense starches almost always need a head start.
- Uneven browning: Rotate pans between oven racks at the halfway mark and flip dense items once. If one side of your oven runs hotter, rotate the pan 180 degrees too.
- Flat, dull flavor: Finish with acid. A squeeze of lemon, a splash of red wine vinegar, or a pinch of finishing salt right before serving wakes up roasted flavors that muted during cooking.
- Burnt edges on thin vegetables: They went in too early or the temp was too high. Add delicate items in the final 10–15 minutes only, and keep the temp at 400°F rather than 425°F for mixed pans with thin-cut veg.
Key Takeaways
Sheet pan meal prep works best when you treat the oven output as flexible parts — roasted protein, caramelized veg, a separate grain, and a stored sauce — then mix and match across the week.
| Point | Details |
|---|---|
| Stage by cook time | Start dense roots and bone-in proteins first; add quick-cook veg in the final 10–15 minutes. |
| Avoid pan crowding | Leave 1/2 to 1 inch between pieces; use a second pan rather than overlap to get caramelization, not steam. |
| Cook grains separately | Quinoa, farro, and rice belong on the stovetop; the oven is for browning proteins and vegetables. |
| Follow USDA storage rules | Refrigerate prepped meals within 2 hours, keep in the fridge for several days, or freeze as needed. |
| Use Forkwardkitchen templates | The six tested templates above cover a full week of variety with honest timing, yield, and difficulty ratings. |
Why the two-hour plan changes how you think about cooking
Most people approach meal prep as cooking finished dishes in advance, which creates a mental block: you have to decide Monday’s dinner on Sunday. Sheet pan prep sidesteps that entirely. You are not cooking meals; you are building a pantry of cooked parts. Roasted sweet potatoes work in a grain bowl on Tuesday, alongside eggs on Wednesday morning, and tucked into a wrap on Thursday. That flexibility is what makes the habit stick.
The two-hour timeline also reframes what “effort” means. The active work — chopping, seasoning, loading pans — is maybe 30 minutes. The rest is oven time, which you spend doing something else entirely. That ratio is why sheet pan cooking fits real life better than most meal prep methods that demand constant attention.
One thing worth saying plainly: the technique only pays off if the food actually tastes good when you reheat it. That means finishing with acid, storing sauces separately, and reheating in the oven when you have five extra minutes. A container of pale, soft vegetables that you dread eating defeats the whole purpose. The templates and staging guidance above are specifically designed so the food you pull from the fridge on Thursday is still worth eating.
Forkwardkitchen’s tested sheet pan recipes are ready when you are
Every template in this guide maps directly to a recipe in Forkwardkitchen’s collection, each one built from scratch, tested for timing and yield, and rated honestly for difficulty. Whether you are starting with the garlic-herb chicken and sweet potatoes or going straight for the Mediterranean tray, you will know exactly what you are getting before you turn on the oven.
Browse the full sheet pan recipe collection at Forkwardkitchen and pick your first template for this weekend. Every recipe includes prep time, cook time, servings, and storage notes so your Sunday session runs on a real schedule, not a guess.
Selected sources and further reading
The following sources informed the staging guidance, timing references, recipe templates, and food-safety rules in this guide.
- Easy Sheet Pan Meal Prep with Chicken, Sweet Potatoes, and Black Beans — Improv Oven — staging technique, pan crowding, and protein prep guidance
- Sheet Pan Salmon with Potatoes and Chickpeas — Ambitious Kitchen — par-roasting method and staged ingredient timing
- Easy Sheet Pan Meals — Prep Dish — cook-time balancing and grain prep strategy
- Sheet Pan Chicken and Sweet Potato Meal Prep — Cook Liva — meal-parts framework and advance chopping method
- Sheet Pan Dinners — Pinch of Yum — rimmed pan selection and equipment guidance
- Garlic Herb Chicken and Sweet Potato Sheet Pan Meal Prep — Just So Savory — refrigerator and freezer storage timeframes
- USDA / FDA Safe Food Handling — two-hour cooling rule, refrigeration windows, and internal temperature targets
- Forkwardkitchen Sheet Pan Recipes — tested templates with timing, yield, and difficulty ratings